はじめに
爆速とウワサの Vite を使って React x TypeScript な環境を作成しました。他にも MUIv5, Recoil, Jest, Docker などもあわせて作りました。
目次
React の環境とセットアップ
まずは node をインストールします。node 自体はバージョン管理したいので nodenv を使ってインストールします。nodenv を使ったインストール方法はこちらを参照してください。
1
2
3
4
5
|
# バージョンの確認
$ node -v
v16.13.0
$ npm -v
8.1.0
|
React 環境を vite を使って構築します。
1
2
3
4
|
$ npm init vite myapp -- --template react-ts
$ cd myapp
$ npm install
$ npm run dev
|
docker やリモートサーバーの場合は vite.config.ts に host を追記します。
1
2
3
4
5
6
7
|
// https://vitejs.dev/config/
export default defineConfig({
  plugins: [react()],
+  server: {
+    host: '0.0.0.0',
+  },
})
|
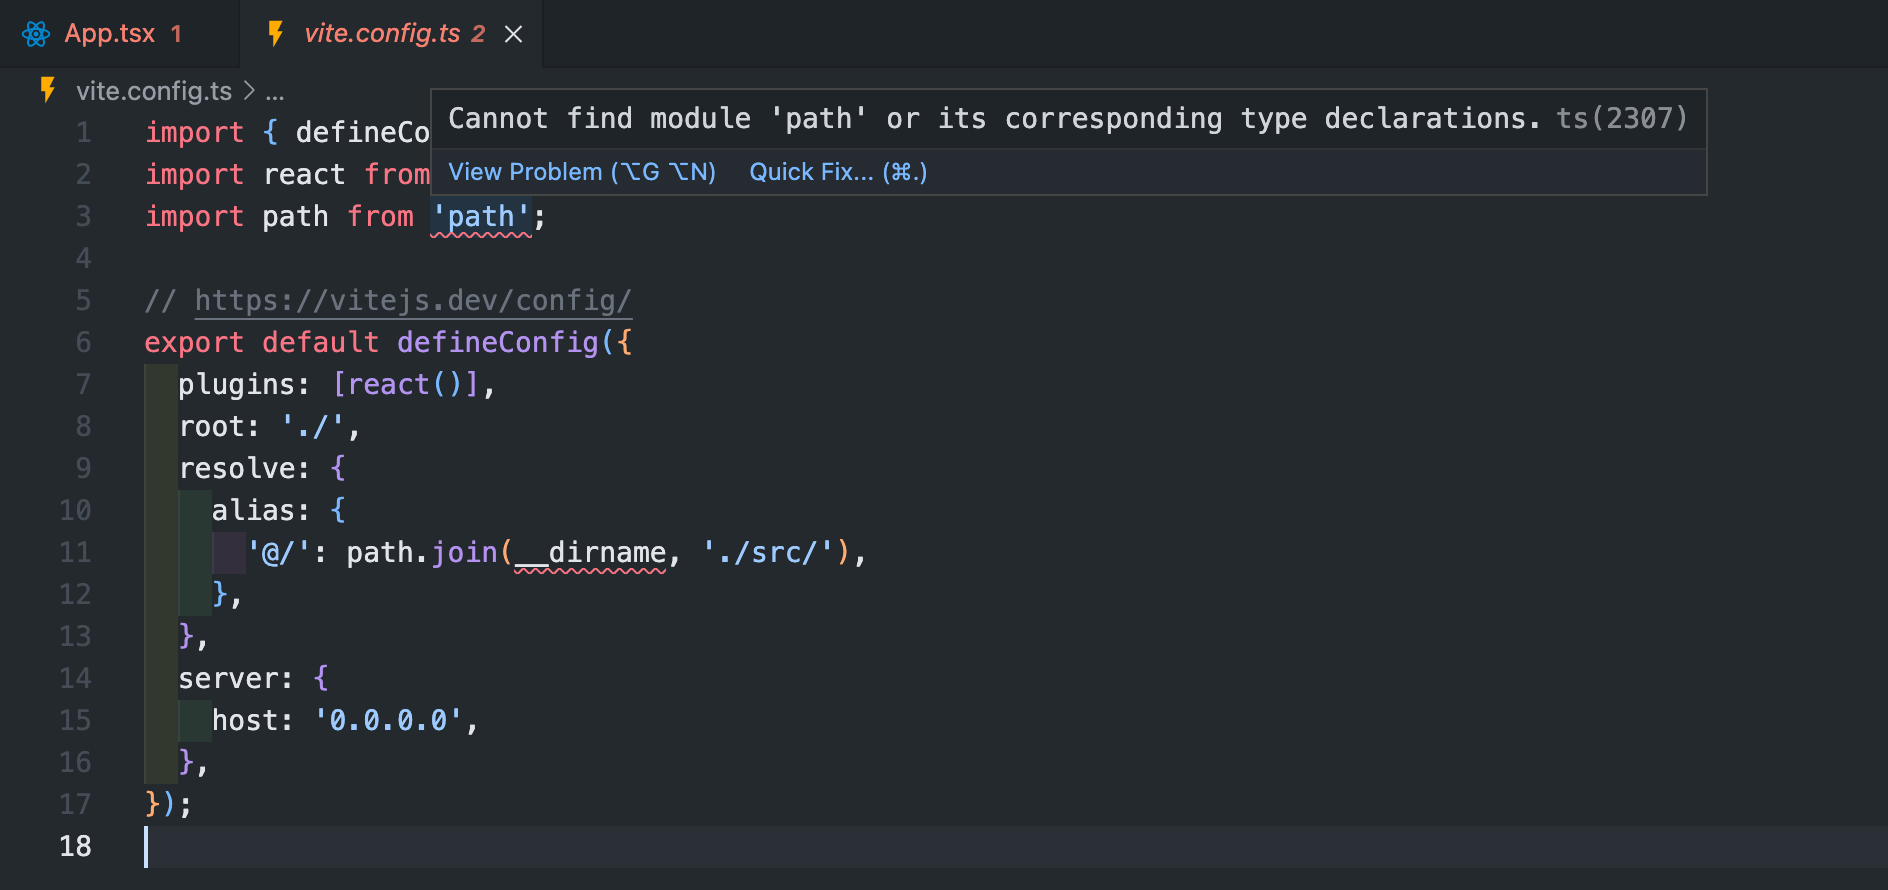
また import などを行うときに相対パスではなく絶対パスで行いたいので vite.config.ts に以下を設定します。
 1
 2
 3
 4
 5
 6
 7
 8
 9
10
11
12
13
14
15
16
17
|
import { defineConfig } from 'vite';
import react from '@vitejs/plugin-react';
+import path from 'path';

// https://vitejs.dev/config/
export default defineConfig({
  plugins: [react()],
+  root: './',
+  resolve: {
+    alias: {
+      '@/': path.join(__dirname, './src/'),
+    },
+  },
  server: {
    host: '0.0.0.0',
  },
});
|
このとき下記のようなエラーが出る場合は $ npm i -D @types/node とすることで解消されます。
Cannot find module 'path' or its corresponding type declarations.Cannot find name '__dirname'.
記事によっては path.join が path.resolve となっていたりしますが、この辺の細かい話しはこちらを参照してください。
さて次に、開発環境をよりよくするために eslint, prettier などを設定します。
なお eslint-plugin-prettier は非推奨なので使用しません。
1
2
3
4
5
6
7
8
|
# ESLint と Prettier
$ npm i -D eslint prettier eslint-config-prettier

# TypeScript ESLint Plugin
$ npm i -D @typescript-eslint/{parser,eslint-plugin}

# React ESLint Plugin
$ npm i -D eslint-plugin-{react,react-hooks}
|
tsconfig.json を編集します。
 1
 2
 3
 4
 5
 6
 7
 8
 9
10
11
12
13
14
15
16
17
18
19
20
21
22
23
|
{
  "compilerOptions": {
    "target": "es2021",
    "useDefineForClassFields": true,
    "lib": ["es2021", "dom", "dom.iterable"],
    "sourceMap": true,
    "allowJs": false,
    "skipLibCheck": false,
    "esModuleInterop": false,
    "allowSyntheticDefaultImports": true,
    "strict": true,
    "forceConsistentCasingInFileNames": true,
    "module": "esnext",
    "moduleResolution": "node",
    "resolveJsonModule": true,
    "isolatedModules": true,
    "noEmit": true,
    "jsx": "react-jsx"
  },
  "include": ["src"],
  "exclude": ["node_modules"],
  "extends": "./tsconfig.paths.json"
}
|
tsconfig.paths.json を作成します。
1
2
3
4
5
6
7
8
|
{
  "compilerOptions": {
    "baseUrl": ".",
    "paths": {
      "@/*": ["./src/*"]
    }
  }
}
|
ここで『さっき絶対パスの指定は vite.config.ts で書いたじゃないか』と思うかもしれません。少しややこしいのですがあれはプログラム側がパスを認識させるために書いています。Vite では tsconfig.json にパスを書いても無視されてしまうので。
では、なぜわざわざ tsconfig.paths.json でパスの設定をしているかというと VSCode などを使っているときにパスが読み込めるようにするためというエディター側に認識させる都合上書いています。
そのため Vite ではなく create-react-app で作成したアプリの場合は tsconfig.json に path の設定を書くだけで大丈夫です。
.eslintrc.json を作成します。
 1
 2
 3
 4
 5
 6
 7
 8
 9
10
11
12
13
14
15
16
17
18
19
20
21
22
23
24
25
26
27
28
29
30
31
32
33
34
35
36
37
38
39
40
41
42
43
|
{
  // 適用する環境
  "env": {
    "es6": true,
    "node": true,
    "browser": true,
    "commonjs": true
  },
  // パーサー
  "parser": "@typescript-eslint/parser",
  // jsx を使います
  "parserOptions": {
    "ecmaVersion": 2018,
    "ecmaFeatures": {
      "jsx": true
    },
    // import 文でモジュールを使用します
    "sourceType": "module"
  },
  // React のバージョンは自動検出に
  "settings": {
    "react": {
      "version": "detect"
    }
  },
  "plugins": ["react-hooks", "react", "@typescript-eslint"],
  // 基本的にルールは recommended に従う
  // prettier は配列の最後尾に書く
  "extends": [
    "eslint:recommended",
    "plugin:@typescript-eslint/eslint-recommended",
    "plugin:@typescript-eslint/recommended",
    "plugin:react/recommended",
    "plugin:react-hooks/recommended",
    "prettier"
  ],
  "rules": {
    // import React from 'react' を書かなくてもいいようにする
    "react/react-in-jsx-scope": "off",
    // TypeScirpt なので prop-types は要らない
    "react/prop-types": "off"
  }
}
|
.eslintignore を作成します。
1
2
3
4
5
6
|
node_modules
.DS_Store
dist
dist-ssr
*.local
node_modules/*
|
.prettierrc.json を作成します。
1
2
3
4
5
|
{
  "singleQuote": true,
  "bracketSameLine": true,
  "bracketSpacing": true
}
|
.prettierignore を作成します。
1
2
3
4
5
6
|
node_modules
.DS_Store
dist
dist-ssr
*.local
node_modules/*
|
VSCode 設定
拡張機能をインストールします。
settings.json を編集します。複数言語で共通の設定を書く方法がない?みたいなので、冗長な書き方になっています。
やり方ご存知でしたら教えて頂けると嬉しいです。また javascriptreact と typescriptreact はそれぞれ jsx と tsx のことです。なんでこんな書き方なんだろうか……
 1
 2
 3
 4
 5
 6
 7
 8
 9
10
11
12
13
14
15
16
17
18
19
20
21
22
23
24
25
26
27
28
29
30
31
32
33
|
"[json]": {
    "editor.formatOnSave": true,
    "editor.defaultFormatter": "esbenp.prettier-vscode"
},
"[javascript]": {
    "editor.formatOnSave": true,
    "editor.defaultFormatter": "esbenp.prettier-vscode",
    "editor.codeActionsOnSave": {
        "source.fixAll.eslint": true
    },
},
"[javascriptreact]": {
    "editor.formatOnSave": true,
    "editor.defaultFormatter": "esbenp.prettier-vscode",
    "editor.codeActionsOnSave": {
        "source.fixAll.eslint": true
    },
},
"[typescript]": {
    "editor.formatOnSave": true,
    "editor.defaultFormatter": "esbenp.prettier-vscode",
    "editor.codeActionsOnSave": {
        "source.fixAll.eslint": true
    },
},
"[typescriptreact]": {
    "editor.formatOnSave": true,
    "editor.defaultFormatter": "esbenp.prettier-vscode",
    "editor.codeActionsOnSave": {
        "source.fixAll.eslint": true
    },
},
...
|
package.json を編集して lint の実行を簡単にします。実行方法は下記の通りです。
- 個別に実行
$ npm run eslint$ npm run prettier
- 両方実行
1
2
3
4
5
6
7
8
9
|
"scripts": {
     "dev": "vite",
     "build": "tsc && vite build",
-    "preview": "vite preview"
+    "preview": "vite preview",
+    "eslint": "eslint . --ext .js,.ts,.jsx,.tsx --fix",
+    "prettier": "prettier --write .",
+    "lint": "npm run eslint && npm run prettier"
   },
|
テスト環境
Jest を使ったテスト環境を作っていきます。まずは必要なパッケージをインストールします。
1
2
3
|
$ npm i -D jest @types/jest eslint-plugin-jest
$ npm i -D @testing-library/{react,jest-dom,user-event}
$ npm i -D @babel/preset-{react,typescript,env}
|
なお eslint-plugin-jest は eslint がインストール&設定済みであることを前提とします。
jest.setup.ts を作成します。
1
|
import '@testing-library/jest-dom';
|
jest.config.js を作成します。
 1
 2
 3
 4
 5
 6
 7
 8
 9
10
11
12
|
module.exports = {
  roots: ['<rootDir>/src'],
  testMatch: [
    '**/__tests__/**/*.+(ts|tsx|js)',
    '**/?(*.)+(spec|test).+(ts|tsx|js)',
  ],
  transform: {
    '^.+\\.(ts|tsx)$': '<rootDir>/node_modules/babel-jest',
  },
  testEnvironment: 'jsdom',
  setupFilesAfterEnv: ['<rootDir>/jest.setup.ts'],
};
|
babel.config.js を作成します。
 1
 2
 3
 4
 5
 6
 7
 8
 9
10
11
12
13
14
|
module.exports = {
  presets: [
    [
      '@babel/preset-env',
      {
        targets: {
          node: 'current',
        },
      },
    ],
    '@babel/preset-react',
    '@babel/preset-typescript',
  ],
};
|
.eslintrc.json を編集します。
 1
 2
 3
 4
 5
 6
 7
 8
 9
10
11
12
13
14
15
16
17
18
19
20
21
22
23
24
25
26
27
28
29
|
--- a/.eslintrc.json
+++ b/.eslintrc.json
@@ -4,7 +4,8 @@
     "es6": true,
     "node": true,
     "browser": true,
-    "commonjs": true
+    "commonjs": true,
+    "jest/globals": true
   },
   // パーサー
   "parser": "@typescript-eslint/parser",
@@ -23,7 +24,7 @@
       "version": "detect"
     }
   },
-  "plugins": ["react-hooks", "react", "@typescript-eslint"],
+  "plugins": ["react-hooks", "react", "@typescript-eslint", "jest"],
   // 基本的にルールは recommended に従う
   // prettier は配列の最後尾に書く
   "extends": [
@@ -32,6 +33,7 @@
     "plugin:@typescript-eslint/recommended",
     "plugin:react/recommended",
     "plugin:react-hooks/recommended",
+    "plugin:jest/recommended",
     "prettier"
   ],
   "rules": {
|
package.json を編集します。
 1
 2
 3
 4
 5
 6
 7
 8
 9
10
11
12
|
--- a/package.json
+++ b/package.json
@@ -7,7 +7,8 @@
     "preview": "vite preview",
     "eslint": "eslint . --ext .js,.ts,.jsx,.tsx --fix",
     "prettier": "prettier --write .",
-    "lint": "npm run eslint && npm run prettier"
+    "lint": "npm run eslint && npm run prettier",
+    "test": "jest"
   },
   "dependencies": {
     "react": "^17.0.2",
|
src/App.test.tsx を作成します。
1
2
3
|
test('that jest is working', () => {
  expect(true).toBe(true);
});
|
テストを実行してみます。
 1
 2
 3
 4
 5
 6
 7
 8
 9
10
11
12
13
|
$ npm run test

> myapp@0.0.0 test
> jest

 PASS  src/App.test.tsx
  ✓ that jest is working (2 ms)

Test Suites: 1 passed, 1 total
Tests:       1 passed, 1 total
Snapshots:   0 total
Time:        1.126 s
Ran all test suites.
|
Material UI
UI ライブラリとして Material UI を使用します。必要なパッケージをインストールします。
1
2
3
|
$ npm i @mui/material @emotion/react @emotion/styled
$ npm i @fontsource/roboto # お好みで
$ npm i @mui/icons-material
|
emotion の testing utilities をインストールします。jest の環境構築が済んでいることが前提です。
1
|
$ npm i -D @emotion/jest
|
jest.config.js を編集します。
1
2
3
4
5
6
7
8
|
--- a/jest.config.js
+++ b/jest.config.js
@@ -9,4 +9,5 @@ module.exports = {
   },
   testEnvironment: 'jsdom',
   setupFilesAfterEnv: ['<rootDir>/jest.setup.ts'],
+  snapshotSerializers: ['@emotion/jest/serializer'],
 };
|
その他ライブラリ
その他、使い勝手のよいライブラリをいくつかインストールします。詳しい使い方は他サイト参照してください。
1
2
3
|
$ npm i axios           # https://github.com/axios/axios
$ npm i react-hook-form # https://react-hook-form.com/jp/
$ npm i react-location  # https://react-location.tanstack.com
|
Recoil
1
|
$ npm i recoil # https://recoiljs.org
|
eslintrc.json を編集します。
 1
 2
 3
 4
 5
 6
 7
 8
 9
10
11
12
13
14
15
16
17
18
|
--- a/.eslintrc.json
+++ b/.eslintrc.json
@@ -40,6 +40,14 @@
     // import React from 'react' を書かなくてもいいようにする
     "react/react-in-jsx-scope": "off",
     // TypeScirpt なので prop-types は要らない
-    "react/prop-types": "off"
+    "react/prop-types": "off",
+    // react-hooks with recoil
+    "react-hooks/rules-of-hooks": "error",
+    "react-hooks/exhaustive-deps": [
+      "warn",
+      {
+        "additionalHooks": "(useRecoilCallback|useRecoilTransaction_UNSTABLE)"
+      }
+    ]
   }
 }
|
Docker
Docker 環境の構築ですが、サービス要件によっては使わないほうがいい場合もあると思っています。
例えば、単純な SPA な Web アプリケーションでフロントとバックエンドが切り離されているような場合、フロント側は DB コンテナもキャッシュコンテナも必要なく、そこまで複雑な構成になりません。
また node のバージョン違いによる問題も起きにくく、かつパッケージ管理も npm があれば問題ありません。
ローカル開発環境も冒頭に紹介した nodenv で node をインストールすれば済みますし、無理に Dockernize しても基本的に I/O ヘビーなフロント開発においてはかえって開発体験が悪くなってしまいます(特に Dokcer for Mac などでは顕著)。
本番環境は CDN などにビルド済みファイルを配置するパターンで済む場合もあります。
一方で Dockernize した方がいい場合というのは、例えばミドルウェアとしてインストールがやっかいな ImageMagick を使う必要があるとか、本番環境に AWS の Fargate や App Runner といったコンテナ環境を動かすことで運用していく前提がある場合などです。
本記事では開発環境は Docker を使わず、本番環境でコンテナを動かすという前提で Dockernize します。Dockernize においてはマルチステージビルドを使います。フェーズ1でビルドを実行し、フェーズ2でビルド済みファイルを Nginx で配信するコンテナを作るようにします。
Dockernize においては、以下の話しから distroless を検討しましたが公式で Nginx のランタイムはなかったので保守運用を考えて alpine を使うことにします。
それでは Dockernize について書いていきます。なお Dockerizing a React App を参考にしています。
まず .dockerignore を作成します。
Dockerfile を作成します。
1
2
3
4
5
6
7
8
9
10
11
12
13
14
15
16
17
18
19
20
21
22
23
24
25
26
|
#
# STAGE 1
#
# Uses a Node LTS image to build
#
FROM node:16-bullseye AS build
WORKDIR /opt/app
COPY package.json package-lock.json ./
RUN npm i -g npm@latest && npm ci --no-optional
COPY tsconfig.json tsconfig.paths.json index.html vite.config.ts ./
COPY src ./src
RUN npm run build
#
# STAGE 2
#
# Create final image
#
FROM nginx:stable-alpine
COPY docker/nginx/nginx.conf /etc/nginx/nginx.conf
COPY --from=build /opt/app/dist /public
EXPOSE 80
|
docker/nginx/nginx.conf を作成します。
 1
 2
 3
 4
 5
 6
 7
 8
 9
10
11
12
13
14
15
16
17
18
19
20
21
22
23
24
25
26
27
|
worker_processes 2;

events {
    worker_connections 1024;
    multi_accept on;
    use epoll;
}

http {
    include /etc/nginx/mime.types;

    server {
        listen 80;
        server_name 127.0.0.1;
        access_log /dev/stdout;
        error_log stderr;

        location / {
            root /public;
            index index.html;
            try_files $uri $uri/ /index.html =404;
            gzip on;
            gzip_types text/css application/javascript application/json image/svg+xml;
            gzip_comp_level 9;
        }
    }
}
|
compose.yml を作成します。
1
2
3
4
5
|
services:
  app:
    build: .
    ports:
      - 8080:80
|
$ docker compose build でビルドします。
$ docker compose up でコンテナを起動します。
localhost:8080 にアクセスして確認します。
以上で Dockernize 完了です。
参考サイト